The Flash movie at left builds upon the standard preloader from the last tutorial, but instead of drawing a bar with the drawing API to represent a graphic, the drawing API is used to slowly unmask a predrawn graphic. Textfields at the top and bottom show numerical values of the amount loaded and total amount of kilobytes for the movie. To repeat the animation once the movie is fully loaded, simply refresh this browser window.
Well, we've reached the end of our preloaders tutorials, which have covered the basic concepts of scripting a preloader to display information concerning the amount of data loaded into a movie, by first giving textual feedback, then scaling a loading bar, and finally drawing the loading bar through code using the new drawing API.
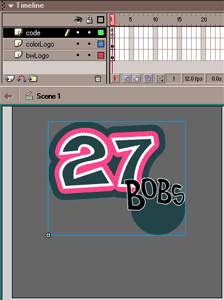
Now you have all you really need to go off and design some new and interesting variations on the preloader, which above all should give the user information and feedback during the loading process. However, there is nothing stating that you can't present that information in different, cool, or exciting ways! In this tutorial, we will perform just a little adapting of our code from the previous tutorial to create a "colorizing" effect of a logo, namely that of 27Bobs. We have almost all of the code we need, so you should be able to see how easy it is to create different effects as long as you know the general concepts of preloading, which by now you should know backwards and forwards!
Open up the finished file from the last tutorial. If you'd like, you can just download my version here. Save this file as "preloaders4.fla".
Create two new layers on your main timeline (for a total of three). Keep the "code" layer on top, with a new layer "colorLogo" in the middle and a new bottom layer "bwLogo". I also changed the background color of the movie to #666666.
We need two logos or images on our stage. One should be black and white and placed on the "bwLogo" layer, while the other needs to be full color and placed on the "colorLogo" layer. The logos/images should be identical except for the color (or lack thereof). If you would like to use your own logo, create these two variations, then place them centrally on your stage, aligned with each other. Otherwise, you can download the finished version of this file here and copy and paste the logos I've already prepared.
If you have created or are using your own logo, turn the color version into a movieclip symbol and name the instance on stage "colorLogo". Make sure you set its registration point at the LOWER LEFT of the symbol. This is where we will place our mask clip to draw a box up from.
Open the Actionscript editor for frame 1 of the "code" layer. The code from the previous tutorial should be there. We are going to delete some lines, add some lines and alter a few lines. Most of the code from the previous effect can be salvaged, even the though the new effect is very different. Let's step through slowly and look at the changes. The code which before began:
should be changed to (alterations in white, though look for the deletions!):
maskFullWidth = colorLogo._width;
maskFullHeight = colorLogo._height;
this.createEmptyMovieClip("mask", 0)
mask._x = colorLogo._x;
mask._y = colorLogo._y;
colorLogo.setMask(mask);
See? We actually deleted more than we added. In these few lines we set two variables to hold the total height and width of our logo, create a new empty movieclip to hold our drawing object, place this clip at the registration point of our colorLogo (which is at the lower left of the logo) and set this clip as the mask for the colorLogo.
Let's move on to the next block of code which created our TextFormat objects. Before, it read:
loadingTF = new TextFormat();
loadingTF.font = "_sans";
loadingTF.color = 0xAFAFE4;
loadingTF.size = 22;
loadingTF.align = "right";
leftAlignTF = new TextFormat();
leftAlignTF.align = "left";
You can change this to:
loadingTF = new TextFormat();
loadingTF.font = "_sans";
loadingTF.color = 0xCCCCCC;
loadingTF.size = 22;
Wow! Still deleting more than we're adding! I like this game! Here we have deleted our second TextFormat object completely since we will be aligning both fields from the center (in the previous tutorial, you will recall that we needed to have two formats to accommodate the left and right alignment of our textfields). In fact, we are also able to delete the setting of the align property in our single TextFormat. The reason for this is that the autoSize property of each textfield will take care of the center alignment for us. As a final note, the color for the TextFormat was changed to match our new (lack of) color scheme.
What changes did we need to make? Well, first we needed to change the _x and _y position at which we placed our two textfields (the 3rd and 4th parameters in the createTextField call). The _x position for both is the center of our stage, while the _y position differs merely by the height of the colorLogo movieclip. Next, we changed the autoSize property of the textfields to "center", which means that each textfield will expand equally to the left and right to fit whatever text we place inside. Finally, we adjust the _y position on the last line of each block to give a little bit of extra space between the text and the logo.
Only a few more deletions are needed, so I'll simply show the rest of the code with the few changes displayed in white and note which lines were deleted afterwards. See if you can figure out the reason for the changes before we get there!
Hardly anything to change at all! You can see that most of the changes are to refer to our new mask movieclip. We also change the color for the beginFill call, though this isn't entirely necessary since the mask is "colorless" anyway. The main change is the declaration of the local variable top, instead of using right as we did in the last tutorial. This is because we are drawing our mask UP instead of to the RIGHT. The value of this variable is determined by taking the percent our content has loaded and multiplying it by the total height of the logo movieclip. We then call the drawBox method (which didn't need to change a wink) and send it the values for the left, top , right and bottom of our box. If you comment out the setMask line near the top of our code, you will see how the box is drawn a little each frame (or take a look at the following illustration, though you'll probably need to refresh the browser window to see it again.).
Finally, if you have been around since the last tutorial and are wondering what lines were deleted in this step, the three lines excised were those dealing with the drawing and removing of our outline movieclip. Since we are no longer drawing an actual loading bar, the outline to define the bar is unnecessary, so we removed all trace of it.
Test your movie now to see the black and white to color transformation of the logo! If you would like to see how I develop this idea even further, take a look at the finished movie that I breakdown in the Flash Inspiring Interfaces book: Laser Logo.
Well, that brings this group of preloaders tutorials to a close. If you've gone through each lesson, you should now have a very strong grasp of the concepts needed for you to go out and create your own exciting variations. I encourage you to experiment and play, though all the while remembering the reason for a preloader is to keep the user occupied while your main content loads (although we have explored offering the user feedback, you could just as easily create a small game or animation to entertain during the loading process-- the operative word being SMALL).
You could also build upon the preloaders we have created and perhaps create a component that could be dragged and dropped into any movie. Or you could set up a single preloader to load multiple sections into various levels or movieclips. Or modify it to be a preloader in your library to be attached whenever a new section is being loaded. The thing is, all of these variations can be built from the foundation we have set in these tutorials. Make sure you have a firm grasp on these basic concepts, and you can have freedom and fun in experimenting. Go to it! Explore and enjoy!