The Flash movie at left shows a standard loading bar to display the percentage of the content loaded for the movie. The animation is created by simply scaling a symbol from 0 to 100% based on the amount loaded. Textfields at left and right show numerical values of the amount loaded and total amount of kilobytes for the movie. To repeat the animation once the movie is fully loaded, simply refresh this browser window.
A preloader is necessary when you have an amount of content that will not be loaded immediately for the user to view. In order to maintain their interest and keep them from clicking to a different destination, information should be provided to inform them of the waiting time. In the last tutorial, Preloaders 1 : Text Feedback, we created a simple preloader to display this information as text. Now we will look at doing the same thing, but graphically.
The most common form of graphic preloader is the ubiquitous loading bar. It's simple to make for the Flash developer and immediately understandable for the viewer. By coding it properly, we can in fact create a loading bar that can be used for multiple sites, or multiple sections or clips in a site. In this tutorial, we will construct our adaptable loading bar out of a movieclip in our library. In the next tutorial, we will develop this further by using the drawing API. Let's first start with the basics: Ladies and gentlemen, the LOADING BAR!
Open up the finished file from the last tutorial. If you'd like, you can just download my version here. Save this file as "preloaders2.fla".
Delete the textfield and line graphics from the stage.
Draw a long rectangle horizontally across the middle of your stage. The size of the rectangle will be the final size of your loading bar (100% loaded). Give it an outline if you didn’t draw it with one by default. The colors are up to you.
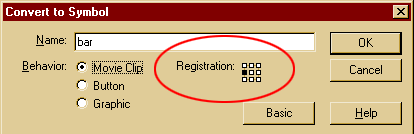
Select only the fill (not the outline) of the rectangle and convert it into a movieclip symbol (F8). Give the symbol the name "bar" and make sure you set the registration point to the middle left of the bar. The reason we do this is so that when we scale the bar up from 0%, it will appear to grow to the right as it increases in scale. Give the instance name of the bar the name "bar" in the Properties panel.
We left the outline for the bar so that the user may see what represents 100% of the loaded information. Since the bar will slowly be scaling up through the loading process, it's important to let users know approximately how much data needs to be loaded before they can proceed.
Add a small dynamic textfield to the left of the bar and give it the instance name "loaded" with a right alignment. Add another textfield to the right of the bar and give it the instance name "total" and a left alignment. Give both of these textfields "_sans" as the font, white (0xFFFFFF) as the color, and deselect the Selectable option (this ensures that the I-bar won't appear when a user rolls over the fields).
Open the Actionscript editor for frame 1 of the code layer. The code from the previous tutorial should be there. Alter the code to read (changes represented in white):
assessLoad = function(clip, endPreloadFunc) {
var kbLoaded = clip.getBytesLoaded()/1024;
var kbTotal = clip.getBytesTotal()/1024;
var percent = Math.floor(kbLoaded/kbTotal * 100);
loaded.text = Math.floor(kbLoaded) + "Kb";
total.text = Math.floor(kbTotal) + "Kb";
bar._xscale = percent;
if ((kbLoaded/kbTotal == 1) && kbLoaded > 1) {
endPreloadFunc();
}
}
Not too much to change. In fact, we are deleting a lot more than we are adding. We have deleted the long block of text assignments since now we are merely interested in a kilobyte readout in our two textfields. We have also deleted the lines in which we find the rate of the data transfer (this is information that is represented in the graphic animation). Instead, we adjust the _xscale of our bar movieclip to match the current percentage of kilobytes loaded into our movie.
If you weren't around for the last tutorial (shame on you!), let me quickly recap what this code is doing. For more in depth explanation, go to the previous tutorial.
We are creating a function to be called to assess the load of whatever clip we specify in the function call (this could be the main movie, a movieclip, a level...). We also send as an argument the function that will be run when the load is complete. Now, each time the function is called (we'll set up the loop in a moment), we look at the amount of bytes loaded as a percentage of the total bytes. It is this percentage that we scale our loading bar up to. We also place the kilobyte amounts (kilobyte because we divide the byte value by 1024) into their respective textfields, but first round the value down to the nearest integer using Math.floor(). Finally, we test to see if the load is complete, and, if so, run whatever function we sent in the function call.
All that’s left now is to set the bar's _xscale to 0 intially, create our ending preload function and set up the loop. Thankfully, we took care of the latter two tasks in the last tutorial, so we don't need to add any code. This is what takes care of it (again, this code should already be in the Actionscript editor):
endPreload() is the function that we call when the preload is complete, which merely clears the interval calling our assessLoad() function and sends our playhead to the next frame. The setInterval line creates the loop that will be called at.. well, set intervals, in this case every 100 milliseconds. We send the arguments "this" (the main movie) and "endPreload" (the function to call at the preload's conclusion). We also make sure to give the interval an identifier ("preload") so that we may clear it when necessary.
All that's left is to set our bar movieclip's _xscale property to 0 at the start of our movie, since that is the amount of data that is loaded at that time. Type the new line ABOVE the setInterval call:
And that's it! Make sure you have a large (as in file size) image in the movie's second frame so that you can see the animated effect. You'll also need to enable "Show Streaming" in your testing environment to see the effect when it's not online. Test your movie and see that loading bar grow!
If you went through the last preloader tutorial, you will see that the basis for assessing the load has remained the same. It is only in how we represented the information that has changed. You will find this is the case with many of your preloaders.
In this example, we used a simple colored bar for our graphic, but you could easily swap it out for something a bit more exciting. Perhaps a portal that opened up from center to admit vistors, or 2001-type Monolith that slowly stretched up from the horizon as if you were slowly approaching it. By using a different symbol for the graphic, and scaling it from a different position on the clip, you can create a wide range of effects. In addition, by making the clip to be assessed into a variable as opposed to hard coding it, we can reuse this preloader for multiple content (we'll discuss this in a loater tutorial).
That's it for this one. The next preloader tutorial will build on these concepts further by utilizing the drawing API to create our loading bar. Until then, explore and enjoy!